If you want to compile a home movie, social media video, or any other type of content you need to be able to join clips together. Most videos are created that way, and are shot in parts that are subsequently cut and merged to create the final product.
Few editors make joining videos as easy as Movavi Video Editor, however, which will let you quickly join your videos in exactly the order that you need. Its intuitive approach requires no prior experience and yet will enable you to join videos together in a matter of minutes – at most.
How to Join Videos?
Assuming you already have the two (or more) videos that you want to join ready, you can launch Movavi Video Editor and click on the ‘Create project in full feature mode’ option to get started. In the editor you can then click on the ‘Add Media Files’ button and select the videos you want to merge, or drag and drop the files into the ‘Timeline’ area directly.
All the videos that you add to Movavi Video Editor will appear in the ‘Timeline’ in the order that they were added. If you want to modify the sequence that the clips are in you can drag them around in the ‘Timeline’ and position them according to your requirements.
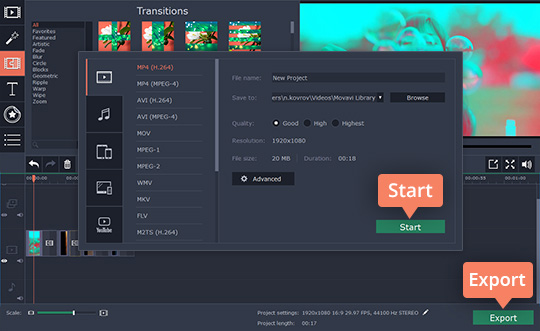
At this stage you can save your video by clicking on ‘Export’ and then selecting the format that you want to use – effectively joining the videos together. In the pop-up window that appears you’ll notice there are different tabs, including some that contain the built-in presets that are present in Movavi Video Editor and will allow you to optimize your video for specific devices and platforms.
While that is all you need to know to join videos with Movavi Video Editor, if you want more detailed instructions you can head over to https://www.movavi.com/support/how-to/how-to-join-videos.html.
Editing Videos Further
Rather than saving your video immediately however, you could use the other features in Movavi Video Editor. A good place to start is to split the videos in the ‘Timeline’ into parts and remove any bits you don’t want. All that you need to do is click on a video segment and move the marker then click on the ‘Split’ icon to do so. After the video has been split you can then select and delete the parts that you want to remove.
Aside from that Movavi Video Editor will let you place animated transitions between segments of videos, apply special effects or filters, incorporate background music, edit audio tracks, insert captions, and much more. Suffice to say you will have a wide range of options to choose from in order to create exactly the type of video that you want.
The fact that Movavi Video Editor is so intuitive a, as well as comprehensive,s definitely one of its main selling points. Overall it will provide you with a versatile option to edit your videos – and joining them is a good first step to take.
