Today, we are going to delve into a practical scenario that many of you might encounter in your future roles as database administrators, developers, or IT professionals. This guide is designed to provide you with a step-by-step walkthrough of how to access a SQL Server database on one server from another server without installing SQL Server on the latter.
The problem we are addressing is quite common in the field. Imagine you have two servers: Server X and Server Y. Server Y hosts a SQL Server database that you need to access, but Server X, where you are currently working, does not have SQL Server installed. You might wonder, “How to access a SQL Server database without a SSMS” This is exactly the question we will answer in this guide.
We will explore two different methods to tackle this problem. The first method involves using the SQLCMD utility, a command-line tool for SQL Server. The second method utilizes dbForge Studio for SQL Server, a powerful integrated development environment (IDE) for SQL Server management and administration.
By the end of this guide, you will have a clear understanding of how to use these two methods to access a SQL Server database on a different server. This knowledge will be invaluable in your future careers, enabling you to handle similar situations with confidence and efficiency. So, let’s get started on this exciting journey of learning and discovery.
Table of Contents
Prerequisites
Before we embark on this journey of learning, it’s important to ensure that we have all the necessary tools and access rights at our disposal. Just as a carpenter wouldn’t start building a table without first gathering all the required materials and tools, we too must prepare before we begin. Here’s what you’ll need:
- Access to Both Servers: You will need access to both Server X and Server Y. This means you should have the necessary credentials to log into these servers. If you don’t have these credentials, you’ll need to request them from your system administrator.
- SQL Server Database on Server Y: There should be a SQL Server database installed on Server Y that you want to access. You should know the name of this database and have the necessary permissions to access it.
- Necessary Permissions: You will need the appropriate permissions to perform operations on the SQL Server database. This includes permissions to read from or write to the database, depending on what you need to do. If you don’t have these permissions, you’ll need to request them from your database administrator.
- SQLCMD Utility: For the first method, you will need the SQLCMD utility installed on Server X. If it’s not already installed, don’t worry. We’ll walk through the installation process in the guide.
- dbForge Studio for SQL Server: For the second method, you will need dbForge Studio for SQL Server installed on Server X. Again, if it’s not already installed, we’ll cover the installation process.
- Basic Knowledge of SQL: Lastly, you should have a basic understanding of SQL (Structured Query Language). We’ll be using SQL commands to interact with the database, so familiarity with SQL will be beneficial.
Remember, preparation is key to success. Ensuring you have all these prerequisites in place will make the process of accessing a SQL Server database on another server much smoother and more efficient.
Using SQLCMD Utility
Let’s start with the first method, which involves using the SQLCMD utility. SQLCMD is a command-line tool for SQL Server. It allows you to enter Transact-SQL statements, system procedures, and script files directly into the command prompt, providing a quick and streamlined way to interact with SQL Server. It’s a bit like having a conversation with your database, but instead of using words, you’re using SQL commands.
Step 1: Installing SQLCMD on Server X
Before we can start our conversation with the database, we need to ensure that SQLCMD is installed on Server X. SQLCMD is part of the SQL Server Feature Pack, which can be downloaded from the official Microsoft website. Once you’ve downloaded the Feature Pack, you can install SQLCMD by following the installation wizard. Remember to check the box for SQLCMD during the installation process.
Step 2: Connecting to the SQL Server Database on Server Y
With SQLCMD installed, we’re ready to connect to the SQL Server database on Server Y. To do this, open a command prompt on Server X and enter the following command:
sqlcmd -S servername -U username -P password
Replace “servername” with the name of Server Y, and “username” and “password” with your SQL Server login credentials. If the connection is successful, you’ll be taken to a new line with a “1>” prompt, indicating that you’re now connected to the SQL Server database.
Step 3: Running SQL Commands
Now that we’re connected, we can start running SQL commands. For example, to select all records from a table, you could type:
SELECT * FROM tablename
Replace “tablename” with the name of your table. After typing the command, hit Enter and then type “GO” on a new line to execute the command. The results will be displayed in the command prompt.
Troubleshooting Common Issues with SQLCMD
As with any tool, you might encounter some issues when using SQLCMD. Here are a few common problems and their solutions:
- Connection Issues: If you’re having trouble connecting to the SQL Server database, double-check your server name and login credentials. Also, ensure that Server Y is running and that you have the necessary permissions to access the database.
- Command Errors: If your SQL commands are not running correctly, make sure you’re using the correct SQL syntax. Also, remember to type “GO” after each command to execute it.
- Installation Problems: If you’re having trouble installing SQLCMD, ensure that you’ve downloaded the correct version of the SQL Server Feature Pack for your system. You might also need to run the installation wizard as an administrator.
Remember, practice makes perfect. The more you use SQLCMD, the more comfortable you’ll become with it.
Using dbForge Studio for SQL Server
Now, let’s move on to the second method of accessing a SQL Server database on another server: using dbForge Studio for SQL Server. dbForge Studio is a powerful integrated development environment (IDE) that simplifies SQL Server management, administration, development, and data reporting. It’s like a Swiss Army knife for SQL Server, providing a wide array of tools and features all in one place.
Step 1: Downloading and Installing dbForge Studio for SQL Server on Server X
The first step is to download and install dbForge Studio on Server X. You can download a free, fully-functional 30-day trial version from the official Devart website. Once you’ve downloaded the installer, run it and follow the installation wizard to install dbForge Studio.
Step 2: Opening Connection Manager in dbForge Studio
With dbForge Studio installed, we’re ready to connect to the SQL Server database on Server Y. To do this, launch dbForge Studio and open the Connection Manager. You can do this by clicking “New Connection” on the Database Explorer toolbar or selecting “New Connection” from the Database main menu.

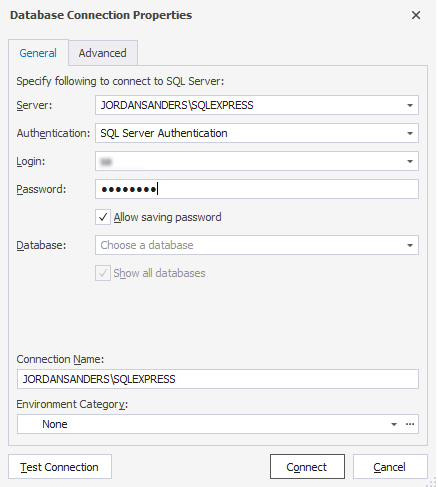
Step 3: Configuring Database Connection Properties
In the Database Connection Properties dialog that opens, you’ll need to configure the connection details. Select the server to which you want to connect, choose the authentication mode, enter the login and password (if required), and select the database you want to connect to. You can also assign an environment category if you wish. For additional connection details such as connection and execution timeout or connection encryption, switch to the Advanced tab.
Step 4: Connecting to the SQL Server Database on Server Y
Once you’ve configured the connection properties, click “Connect” to establish the connection. The new connection will be displayed in the Database Explorer with a green connection icon, indicating that the connection is active.
Step 5: Viewing Databases and Tables
With the connection established, you can now view the databases and tables on Server Y. In the Database Explorer, expand the server connection to view a list of databases. To view the tables in a specific database, expand the database and then the Tables node.
Step 6: Retrieving Data from a Table
To retrieve data from a table, click “New SQL” on the toolbar, type your SQL query in the SQL document that opens, and click “Execute” on the toolbar. For example, to select all records from a table, you could type:
SELECT * FROM tablename
Replace “tablename” with the name of your table. The results will be displayed in the SQL document.
In conclusion, dbForge Studio for SQL Server provides a user-friendly and feature-rich environment for accessing and interacting with SQL Server databases on other servers. It’s a powerful tool that can greatly enhance your productivity and efficiency when working with SQL Server.
Conclusion
As we reach the end of this guide, let’s take a moment to recap what we’ve learned. We started with a common problem: how to access a SQL Server database on one server from another server without installing SQL Server on the latter. We explored two methods to solve this problem: using the SQLCMD utility and using dbForge Studio for SQL Server.
With the SQLCMD utility, we learned how to install it, connect to a SQL Server database, and run SQL commands directly from the command prompt. This method is quick and efficient, but it requires a good understanding of SQL syntax and command-line operations.
On the other hand, dbForge Studio for SQL Server, provides a user-friendly graphical interface for managing SQL Server databases. We walked through the process of downloading and installing, configuring database connection properties, connecting to a SQL Server database, viewing databases and tables, and retrieving data from a table.
While SQL Studio is a paid tool, it offers a free, fully-functional 30-day trial version. This gives you the opportunity to evaluate its features and functionalities before making a purchase decision. Despite the cost, dbForge for SQL Server can be a valuable investment. It simplifies many complex database tasks, making your work with databases much easier and more efficient.
In conclusion, both methods have their strengths and can be useful in different situations. The best method for you will depend on your specific needs, your comfort level with SQL and command-line operations, and your budget. Regardless of the method you choose, the important thing is that you now have the knowledge and skills to access a SQL Server database on another server.
Remember, as future database administrators, developers, or IT professionals, you’ll often encounter challenges that require creative problem-solving. The ability to adapt and learn new tools, like SQLCMD and dbForge Studio for SQL Server, will be invaluable in your careers. So keep exploring, keep learning, and keep pushing the boundaries of what you can do with SQL Server.
