Machine analysis of handwritten digits is a difficult task, but this code pattern will allow you to create a handwritten digit recognizer in Watson Studio and PyTorch, simplifying this task and hence allowing you to scan and retrieve information from any given document in a matter of minutes.
IBM Watson Studio
IBM Watson Studio allows you to build and train AI and Machine Learning models. It also supports data preparation and analysis, all within the cloud itself. Watson Studio provides tools to data scientists, developers to work with data in order to build and train easily scalable models. It provides the flexibility to build models where your data is, and these models can be deployed anywhere in a hybrid environment. You can also accelerate AI integration with machine learning and deep learning workflows.
Watson Machine Learning Service
IBM Watson Machine Learning supports data scientists to move from experimentation to production, deployment, and integration of AI into their applications. It does this by providing a platform for data scientists and developers to work together and accelerate the process in order to move to production. This enables organizations to leverage the power of machine learning and deep learning, which adds value to the business and its processes, eventually creating a streamlined and accurate business offering. Watson Machine Learning is already integrated to work with IBM Watson Studio.
Use Case
Recognition of handwritten numbers is actually quite a task for machines. With machine learning, people have been able to make machines capable of doing this task. There are now banking apps that can scan handwritten cheques, software that can recognize amounts in contracts, and various other applications that simplify the process as well as do the job in a much shorter amount of time.
With Watson Machine Learning, APIs are automatically generated to help developers add AI into their applications promptly. This code pattern will allow you to create a handwritten digit recognizer in Watson Studio and PyTorch, by making use of the Jupyter Notebook.
Development and Process Description
In this code pattern, you have to use Jupyter Notebook in IBM Watson Studio to access pre-installed and optimized PyTorch environments through the Watson Machine Learning Services’ Python client library. The core of the Python client library has a set of REST APIs that allow the developer to submit training jobs, along with being able to monitor, store and deploy models.
While working on this code pattern, you will learn how to create a project in IBM Watson Studio. In this project, Jupyter Notebook is to be used. Python client of Cloud Object Storage is used to create buckets and upload data to the buckets. After this, PyTorch training jobs can be submitted to Watson Machine Learning Service. Finally, the trained PyTorch model is used to predict handwritten digits from any given image. Now, it is automated and can be deployed to analyze any document or image in a matter of minutes and detect and analyze the handwritten digits contained within.
Process Flow
Overview
Recognizing handwritten numbers is a piece of cake for humans, but it’s a non-trivial task for machines. Nowadays, with the advancement of machine learning, people have made machines more and more capable of performing this task. We now have mobile banking apps that can scan checks in seconds and accounting software that can extract dollar amounts from thousands of contracts in minutes. If you are interested in knowing how this all works, please follow along with this code pattern as we take you through the steps to create a simple handwritten digit recognizer in Watson Studio with PyTorch.
What is Watson Studio?
Watson Studio is an integrated environment for data scientists, developers and domain experts to collaboratively work with data to build, train and deploy models at scale. If you are new to Watson Studio, the best way to understand it is to see it in action
What is PyTorch?
PyTorchis a relatively new deep learning framework. Yet, it has begun to gain adoption especially among researchers and data scientists. The strength of PyTorch is its support of dynamic computational graph while most deep learning frameworks are based on the static computational graph. In addition, its strong NumPy like GPU accelerated tensor computation has allowed Python developers to easily learn and build deep learning networks for GPUs and CPUs alike.
In this code pattern, you will use Jupyter Notebook in Watson Studio and access preinstalled and optimized PyTorch environments through the Python client library of the Watson MachineLearningservice, which has a set of REST APIs in its core that allows users to submit training jobs, monitor status, and store and deploy models.
When you have completed this code pattern, you will understand how to:
- Create a project in Watson Studio and use Jupyter Notebooks in the project.
- Use the Python client of Cloud Object Storage to create buckets and upload data to buckets.
- Submit PyTorch training jobs to Watson Machine Learning service.
- Use the trained PyTorch model to predict handwritten digits from images.
Flow
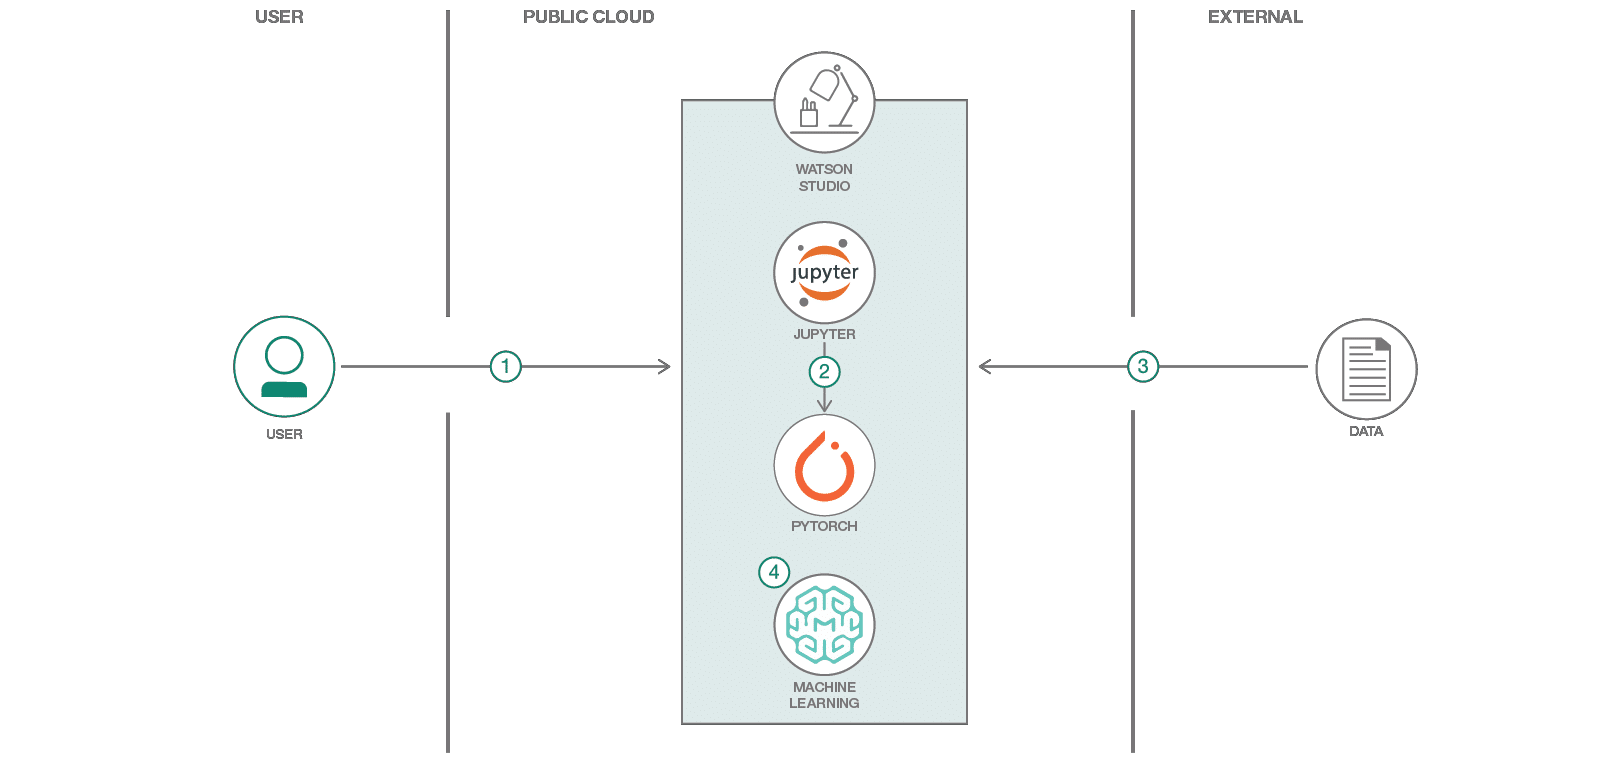
- Log into IBM Watson Studio
- Run the Jupyter notebook in Watson Studio
- Use PyTorch to download and process the data
- Use Watson Machine Learning to train and deploy the model
Included components
Watson Machine Learning: Make smarter decisions, solve tough problems, and improve user outcomes.
Watson Studio: IBM’s integrated hybrid environment that provides flexible data science tools to build and train AI models and prepare and analyze data.
Jupyter Notebooks: An open-source web application that allows you to create and share documents that contain live code, equations, visualizations and explanatory text.
Cloud Object Storage: Provides flexible, cost-effective, and scalable cloud storage for unstructured data.
Featured technologies
Artificial Intelligence: Artificial intelligence can be applied to disparate solution spaces to deliver disruptive technologies.
Python: Python is a programming language that lets you work more quickly and integrate your systems more effectively.
PyTorch: PyTorch is an open source deep learning platform that provides a seamless path from research prototyping to production deployment.
Steps
- Sign up for Watson Studio
- Create a new project
- Create the notebook
- Create a Watson Machine Learning Service instance
- Create HMAC credentials for the Cloud Object Storage instance
- Run the notebook
- See the results
- Sign up for Watson Studio
Sign up for IBM’s Watson Studio. By creating a project in Watson Studio a free tier Object Storage service will be created in your IBM Cloud account. Take note of your service names as you will need to select them in the following steps.
Note: When creating your Object Storage service, select the Free storage type in order to avoid having to pay an upgrade fee.
- Create a new project
From the Watson Studio home page, select NewProject, then select the Create Project button located in the DataScience.
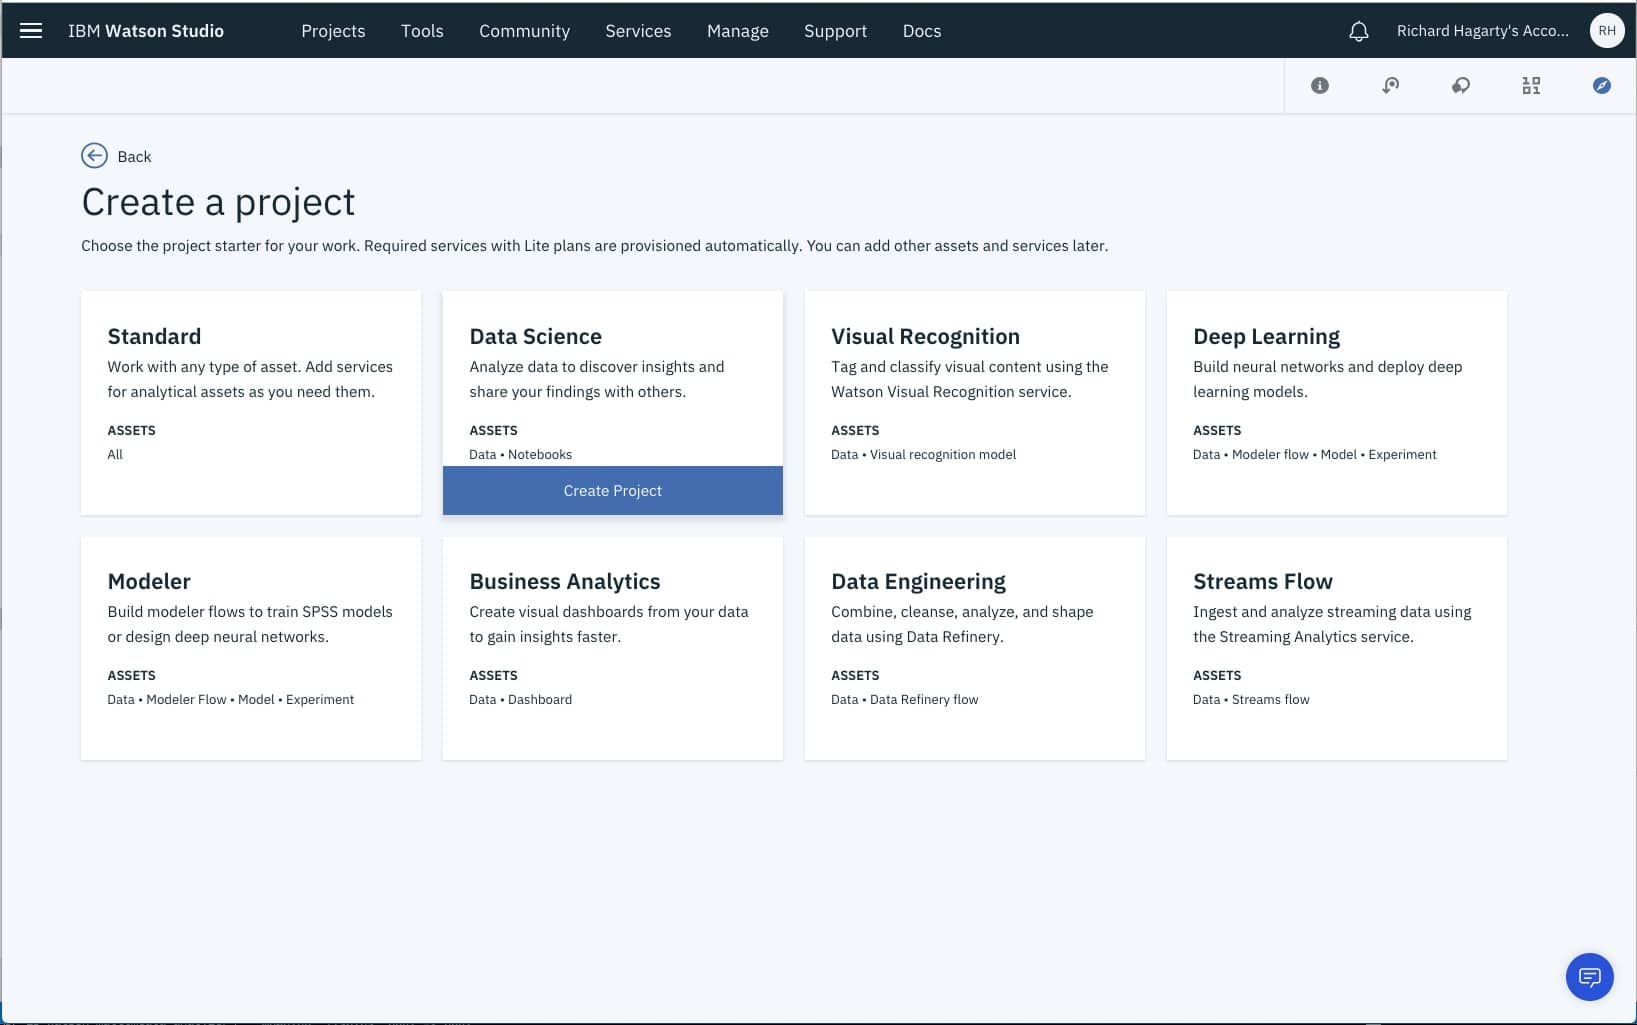
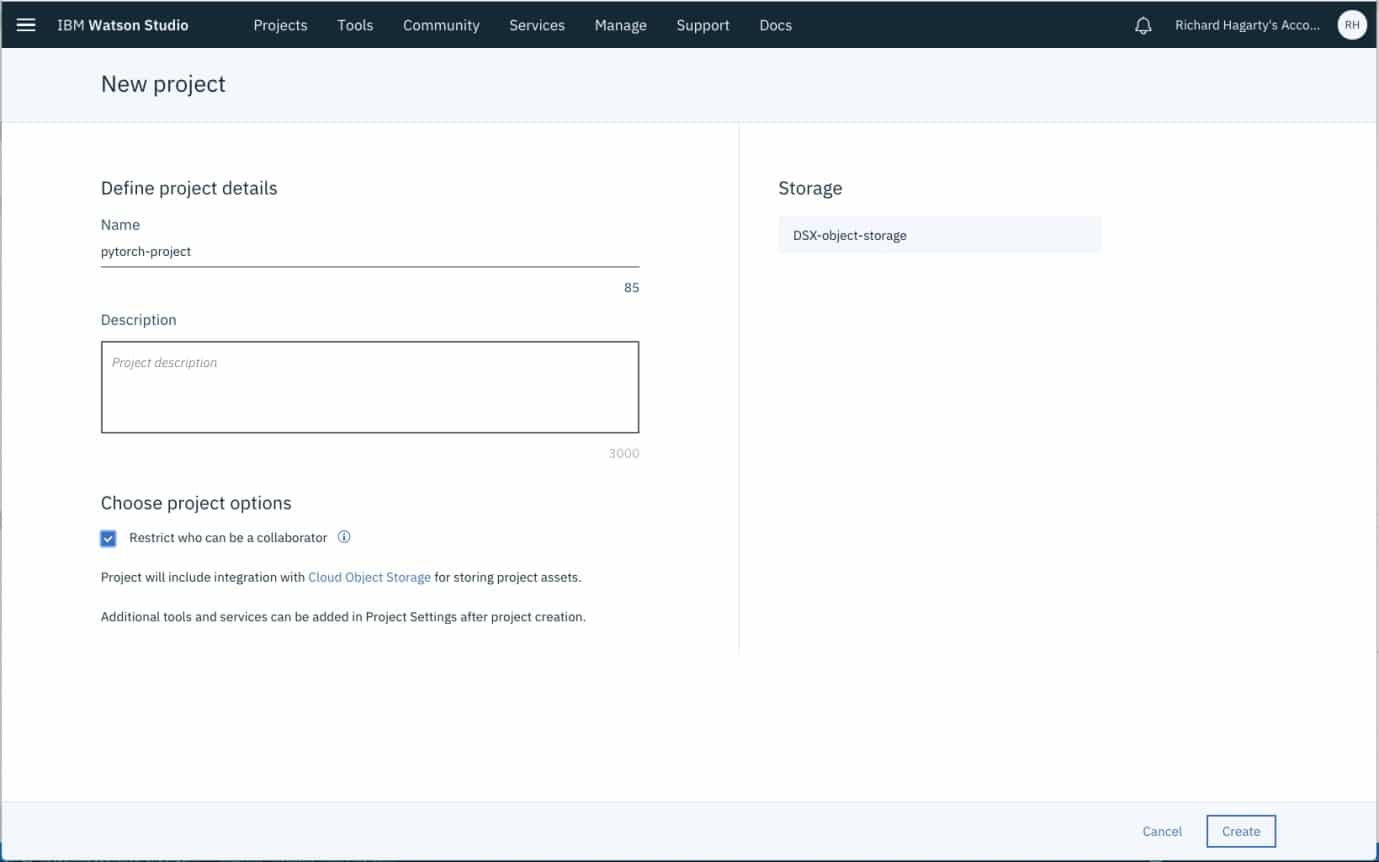
To create a project in Watson Studio, give the project a name and either create a new Cloud Object Storage service or select an existing one from your IBM Cloud account.
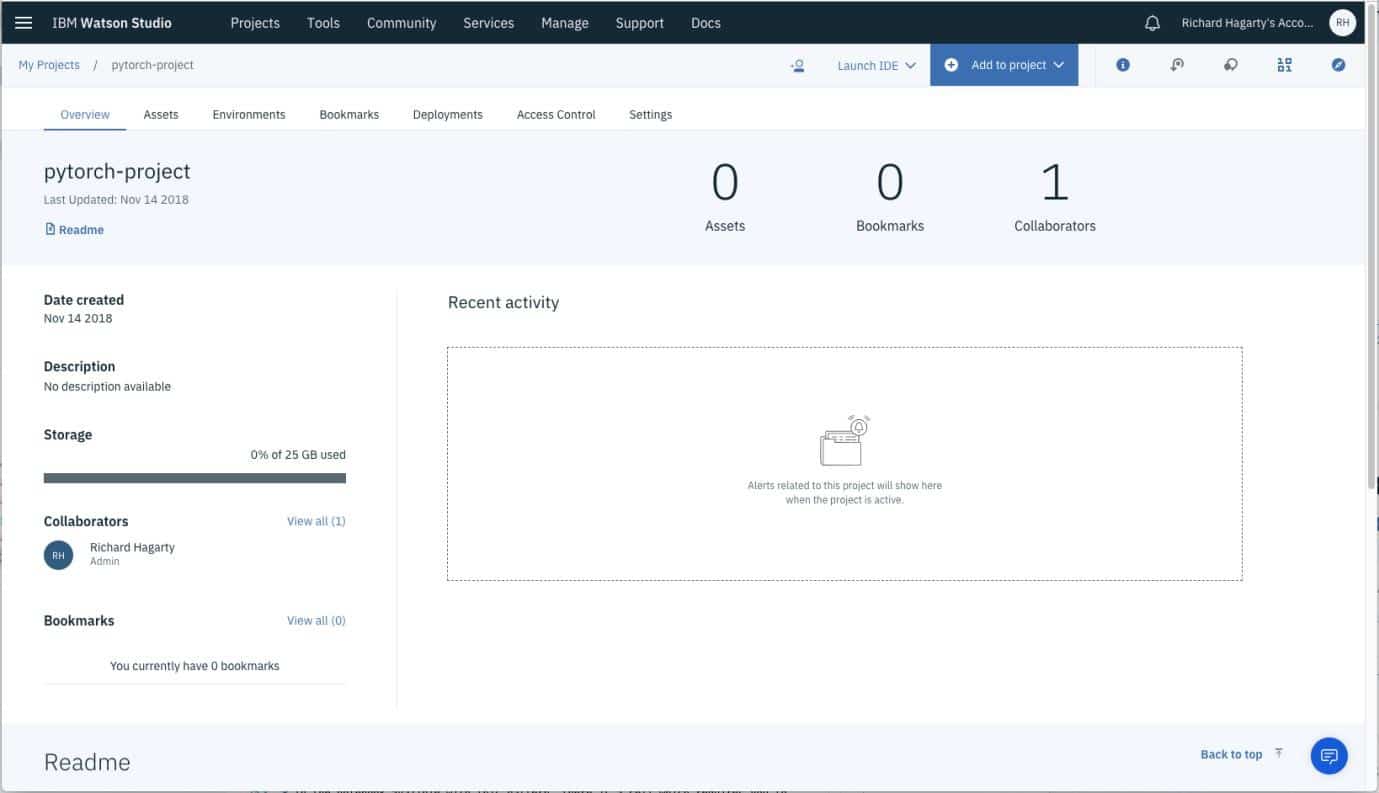
Upon a successful project creation, you are taken to a dashboard view of your project. Take note of the Assets and Settings tabs, we’ll be using them to associate our project with any external assets (such as notebooks) and any IBM Cloud services.
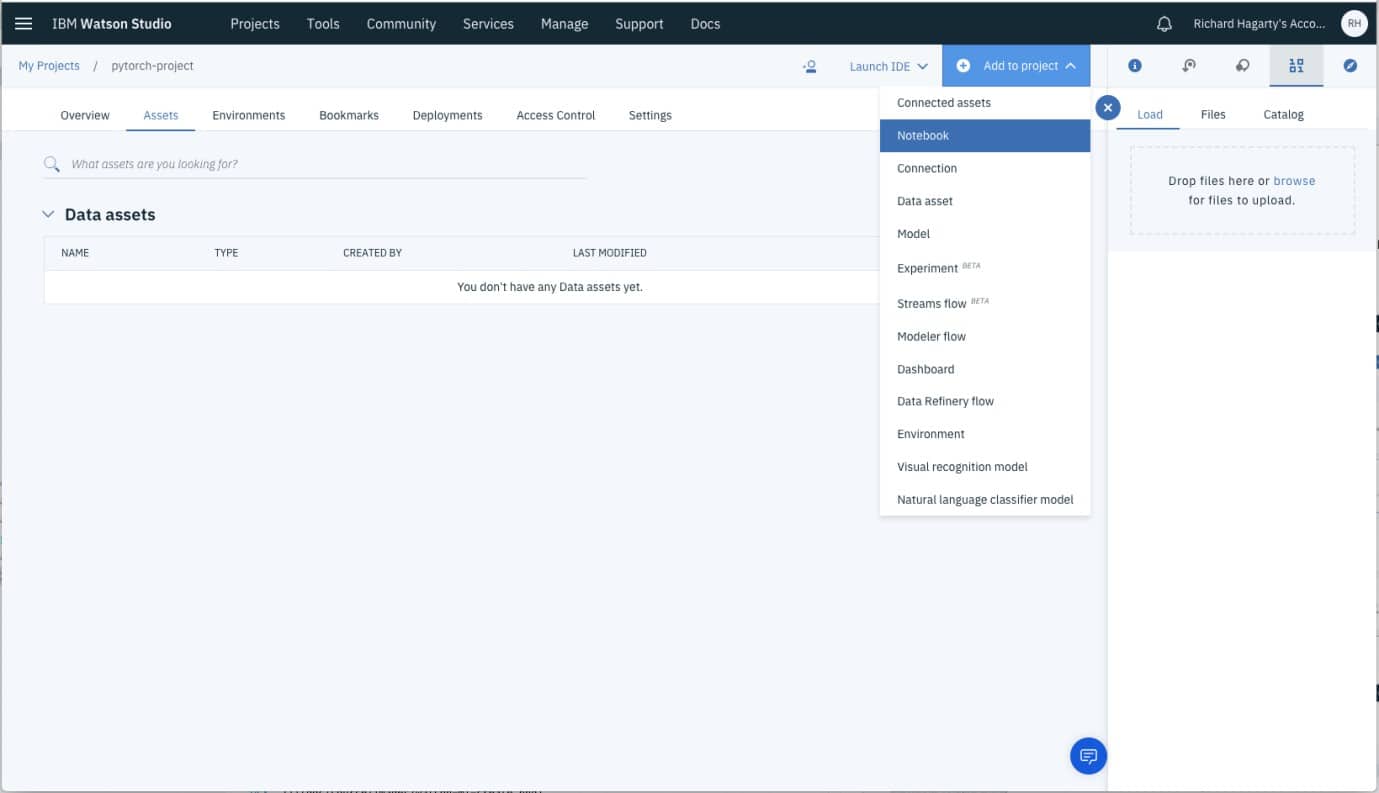
- Create the notebook
From the project dashboard view, select the Add to project drop-down menu and click on Notebook.
Use the From URL tab to create our notebook.
Give your notebook a name and select your desired runtime. In this case, select the Default Python3.5Freeoption.
For URL, enter the following URL for the notebook stored in our GitHub repository:
https://raw.githubusercontent.com/IBM/pytorch-on-watson- studio/master/notebooks/use-pytorch-to-predict-handwritten-digits.ipynb
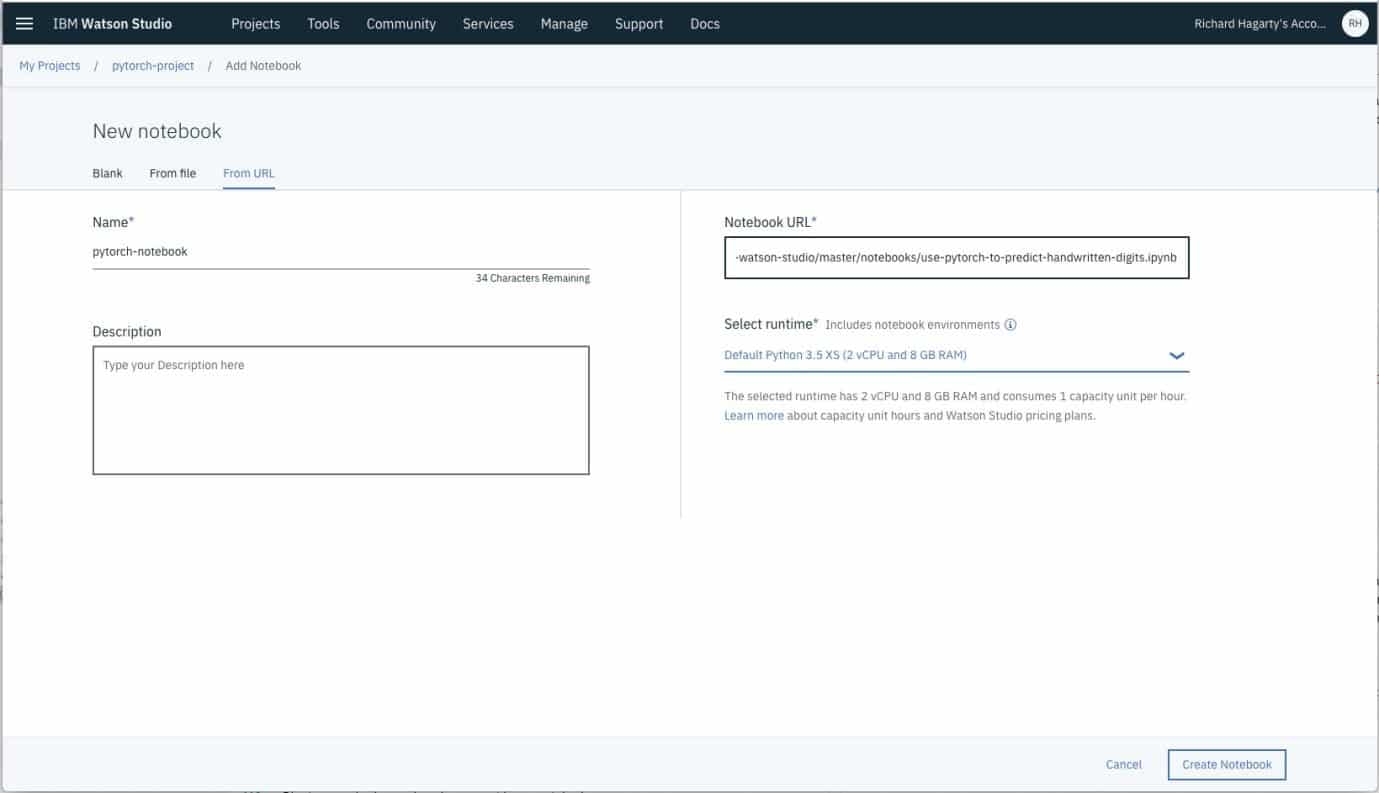
Press the CreateNotebookbutton.
- Create a Watson Machine Learning Service instance
If you do not already have a running instance of the Watson Machine Learning (WML) service, follow these steps to create one.
From the IBM Cloud Catalog, under the AI category, select Machine Learning.
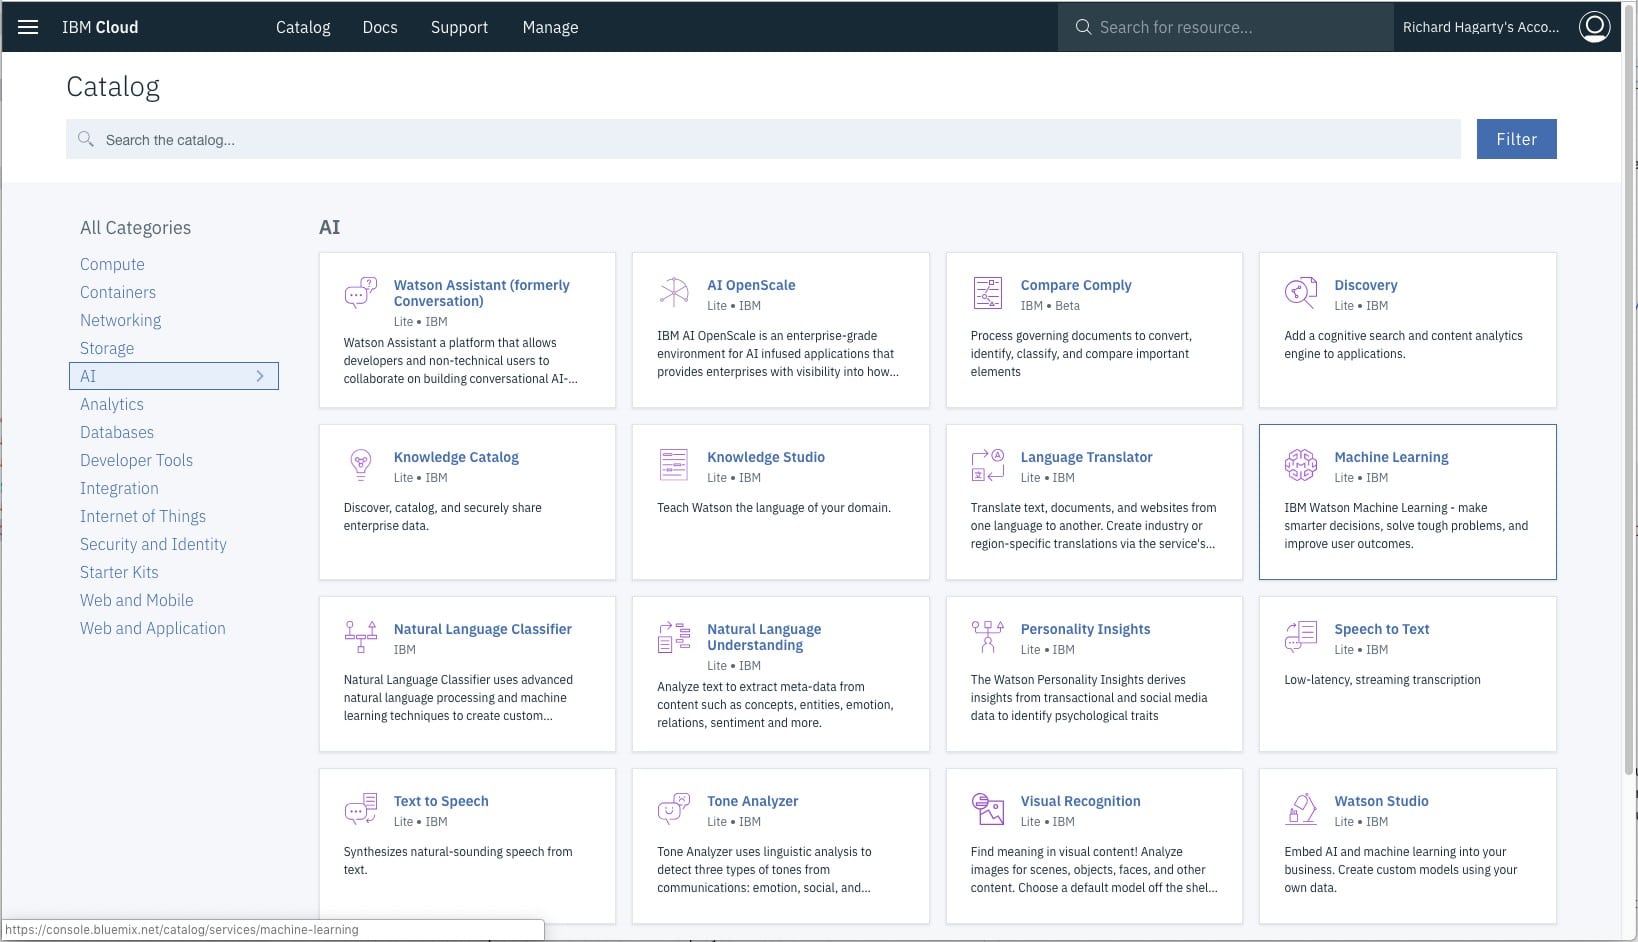
Enter a service name, select the Liteplan, then press Create.
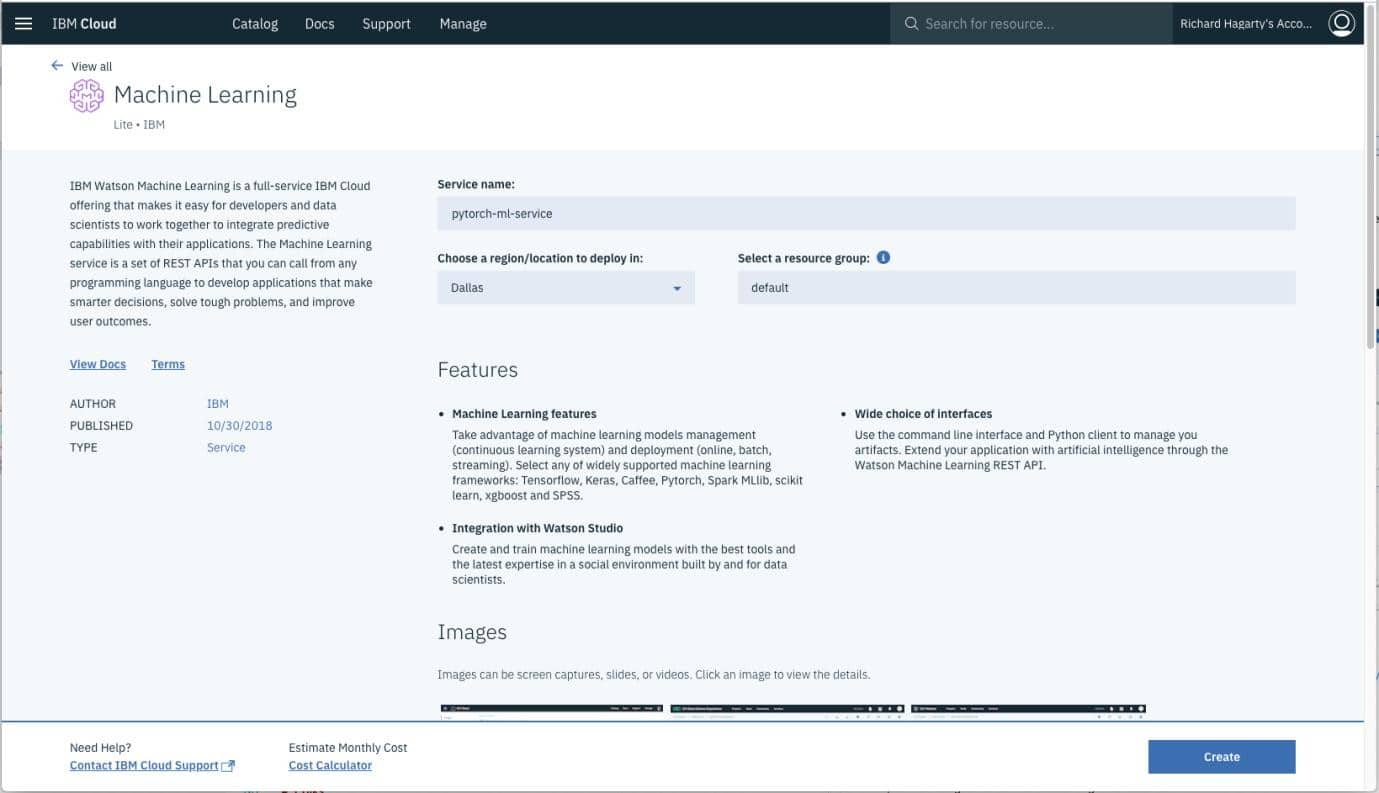
Once the service instance is created, navigate to Service credentials, view credentials and make note of them. If you don’t see any credentials available, create a New credential.
If you get this error: “You do not have the required permission to assign role ‘Writer’. Contact the account owner to update your access.” Give yourself writer access by:
- Use the IBM Cloud menu and select Security.
- Click on Manage.
- Click on Identity and Access.
- Use the three dots icon to assign access to yourself.
- Click on Assign access to resources.
- Use the Services pull down to select All Identity and Access enabled services.
- Use the checkbox to enable Writer.
- Hit Assign.
- Go back and try to create your Watson ML credentials again.
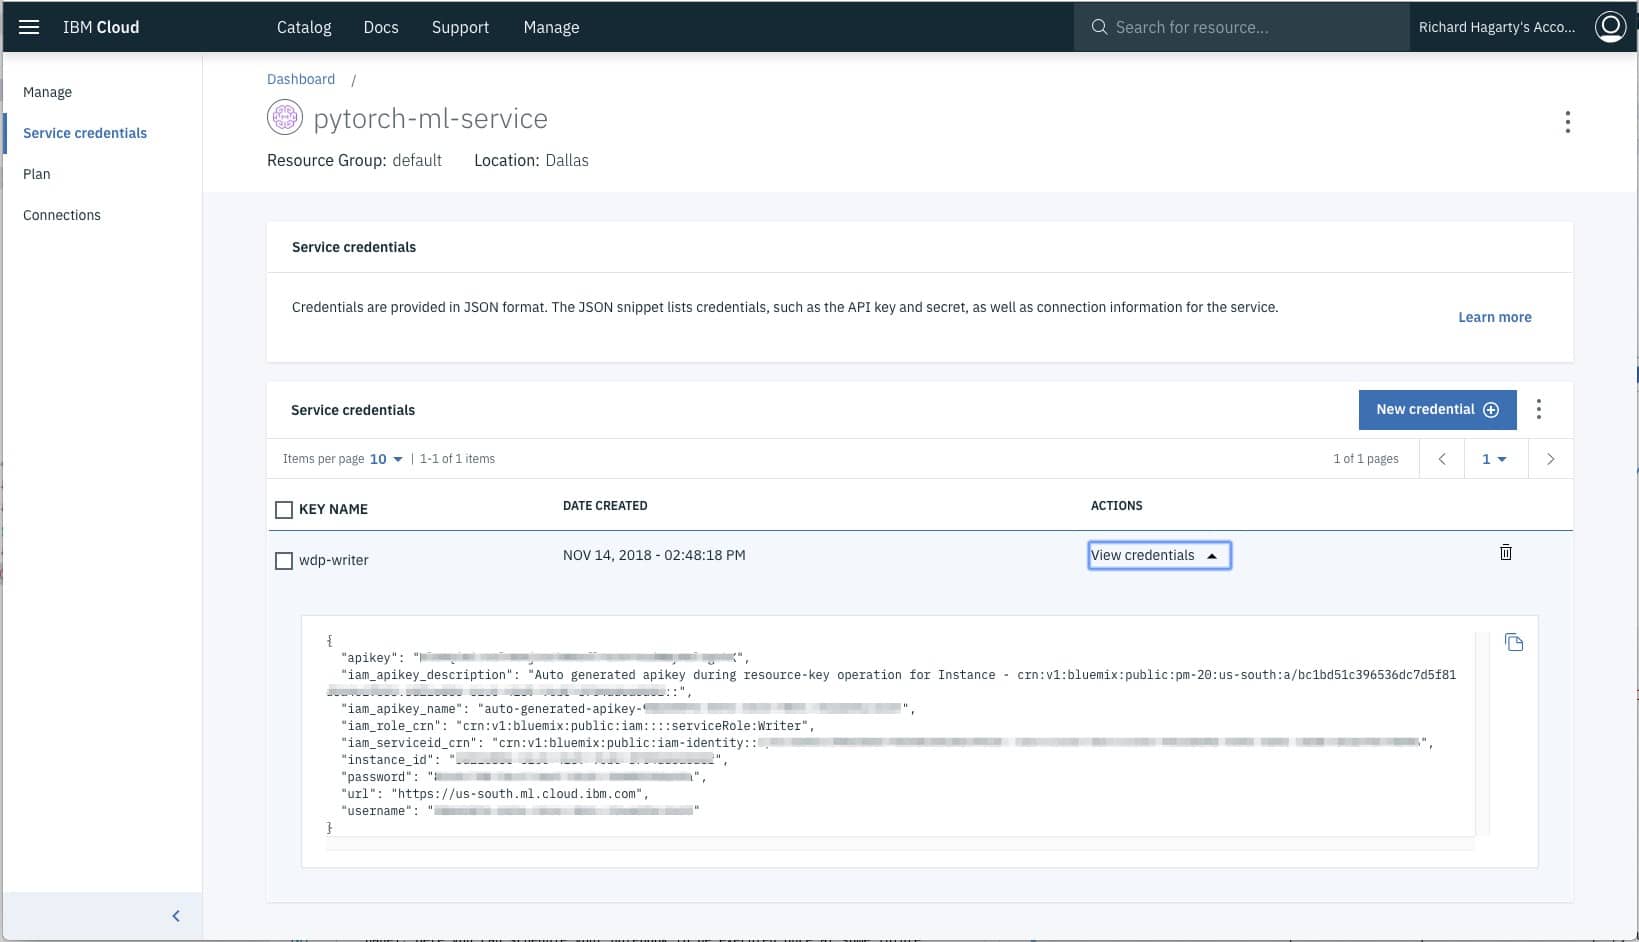
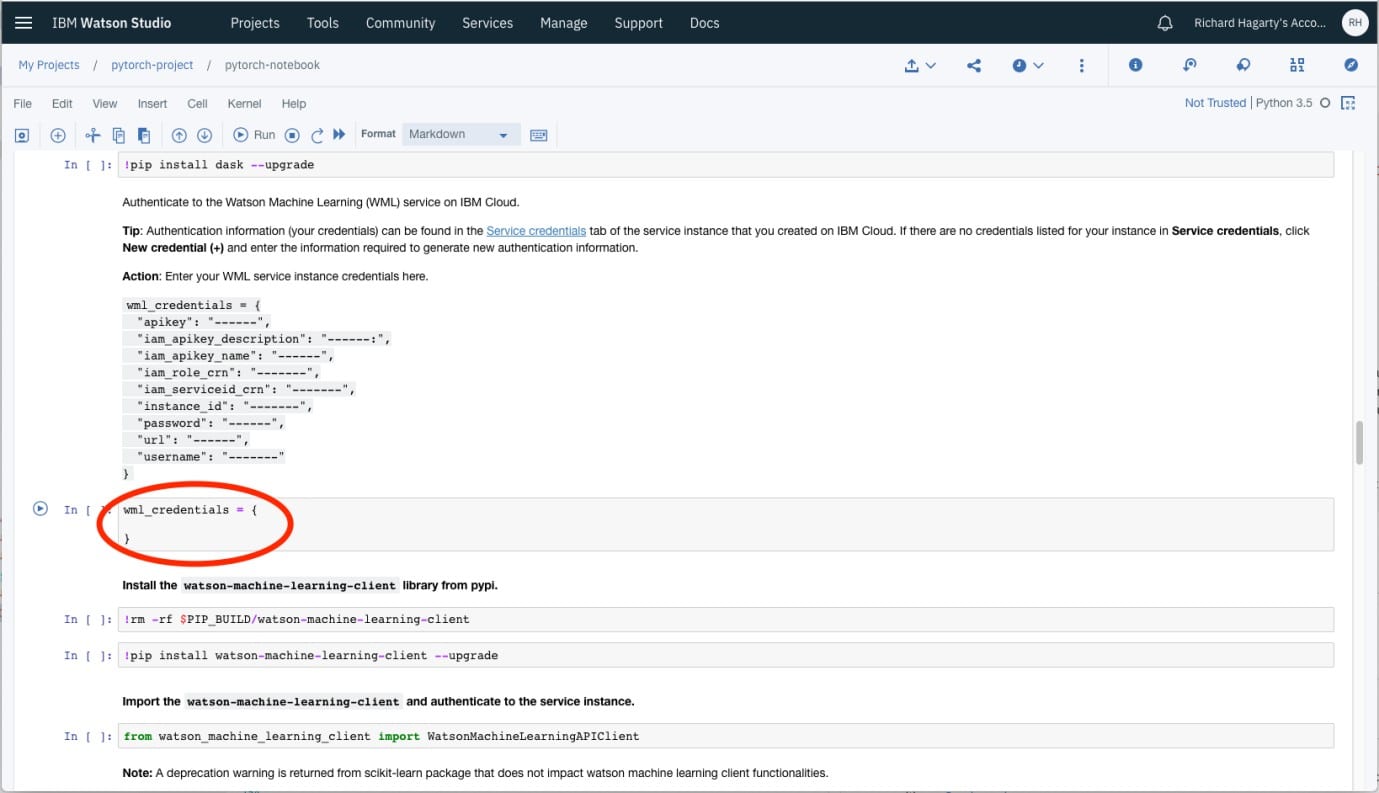
In the notebook available with this pattern, there is a cell which requires you to enter your WML credentials. Copy and paste these credentials into that notebook cell.
- Create HMAC credentials for the Cloud Object Storage instance
To run the notebook available with this pattern, you must create a Keyed-Hashing for Message Authentication(HMAC) set of credentials for your Cloud Object Storage instance.
From the IBM Cloud dashboard, click on the Cloud Object Storage instance that you assigned to your Watson Studio project. Then click the Service credentials tab.
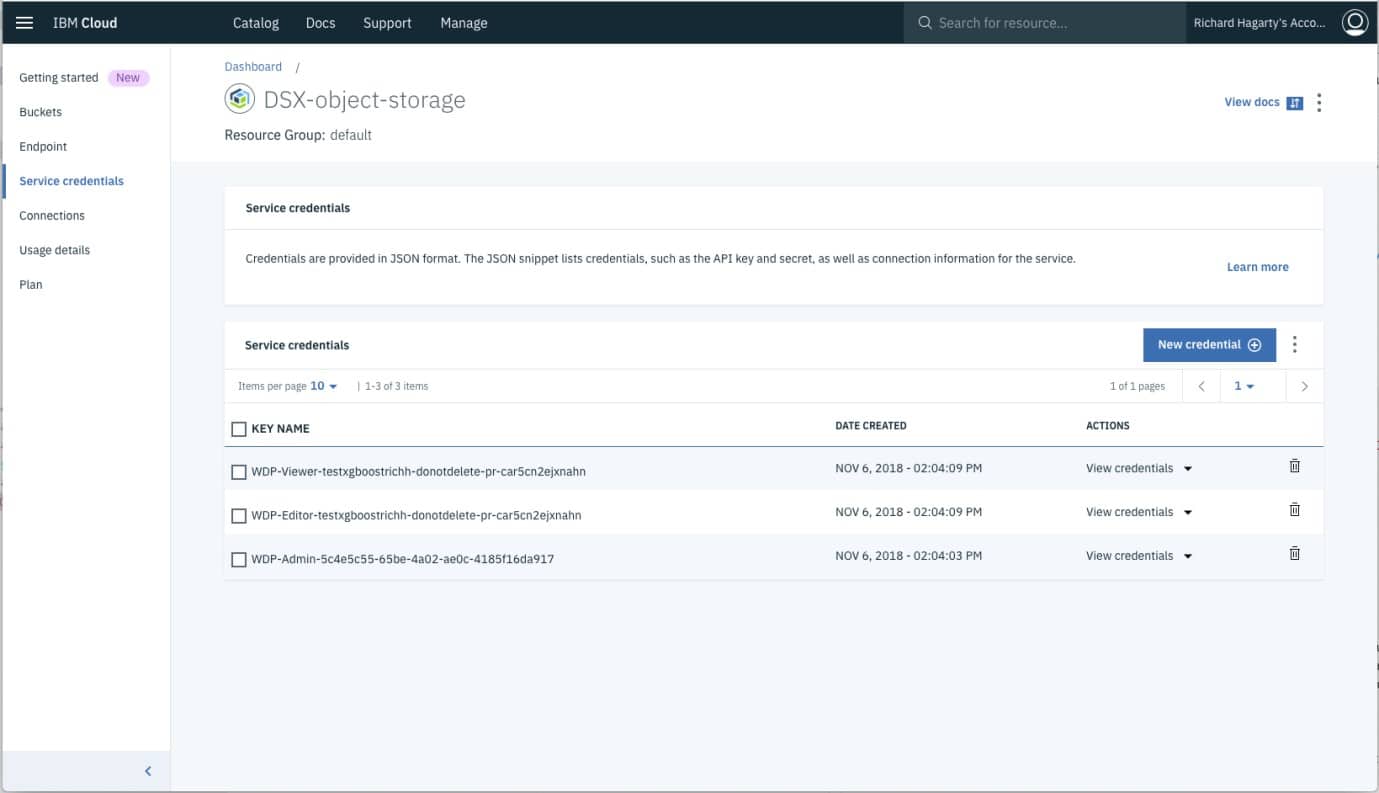
Click on New Credential to initiate creating a new set of credentials. Enter a name, then enter {“HMAC”:true}in the AddInline Configuration Parameters field. Press Add to create the credentials.
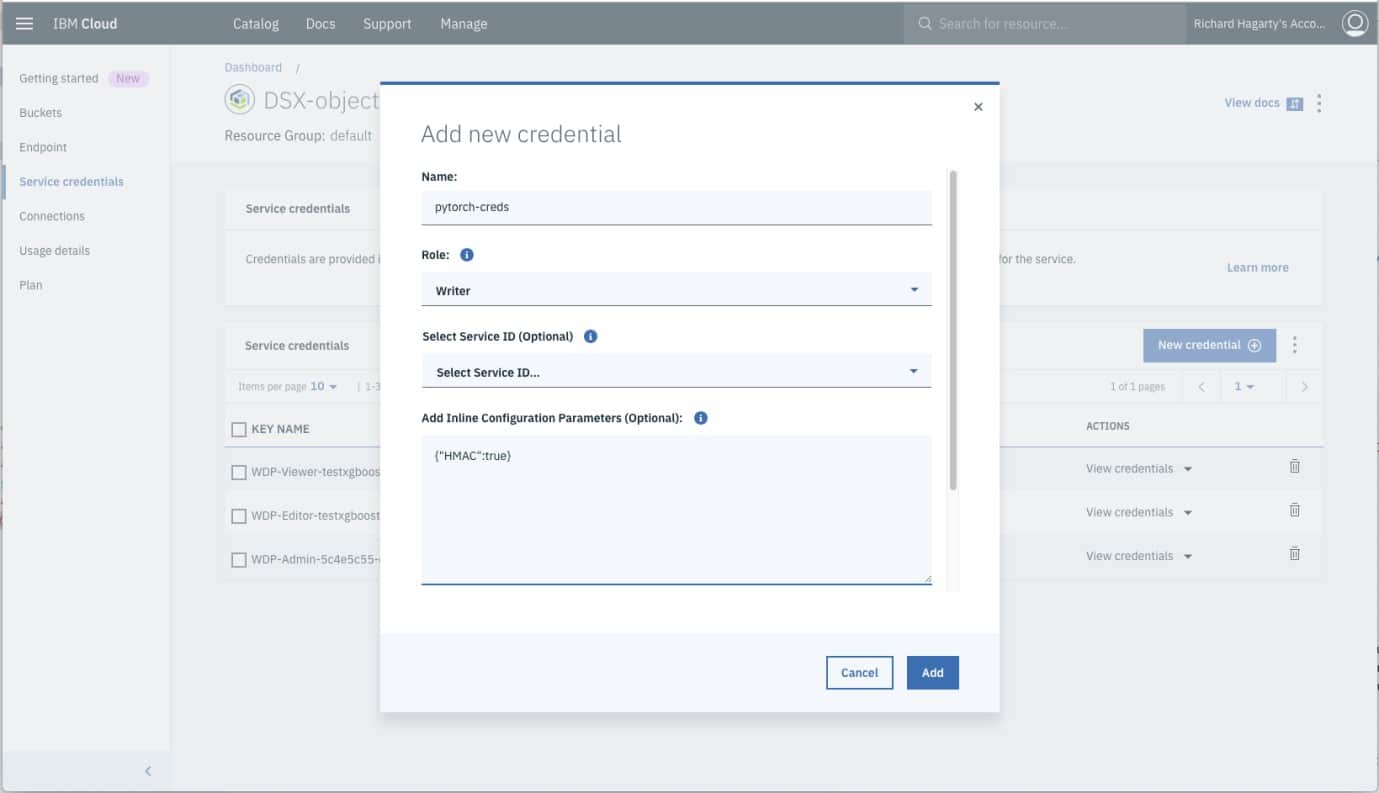
Once the credentials are created, you should see a set of cos_hmac_keys values.
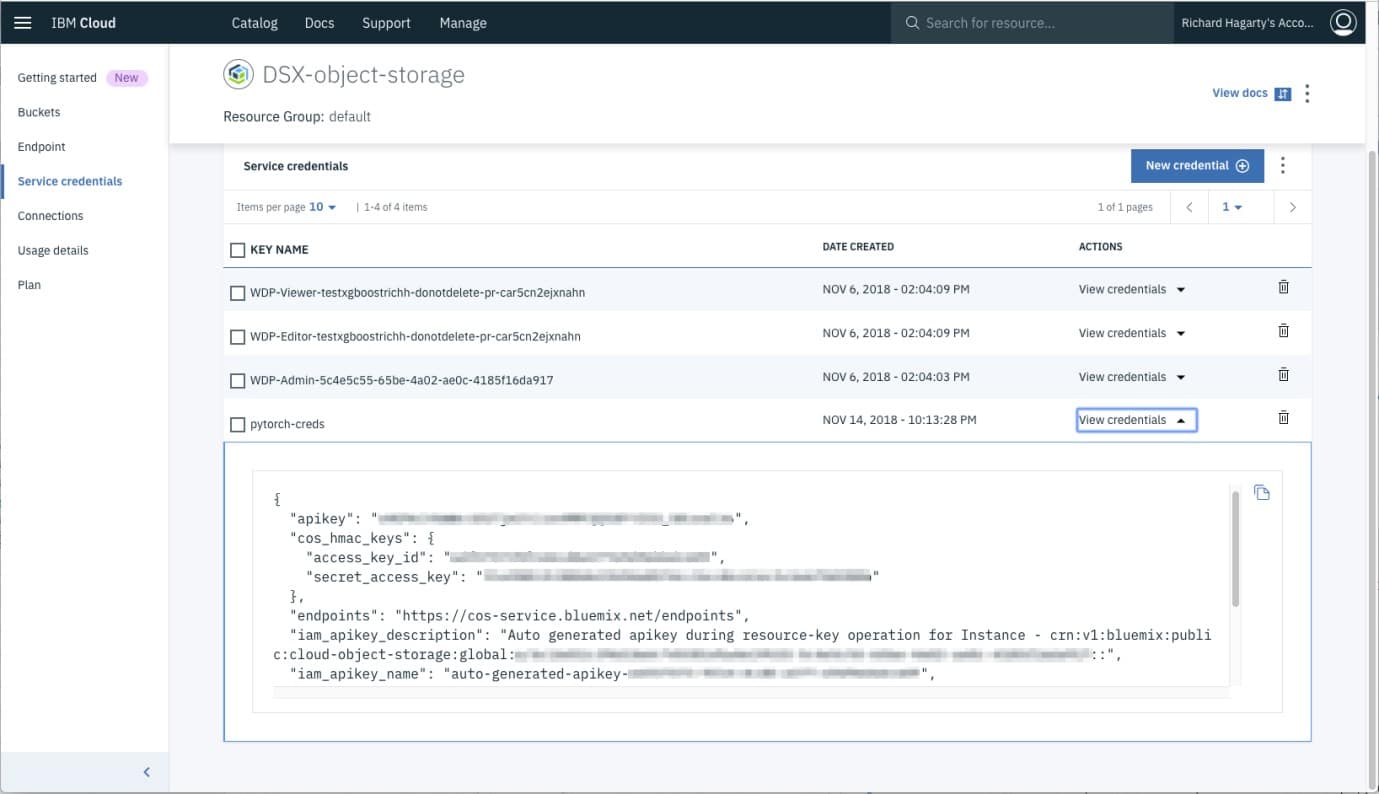
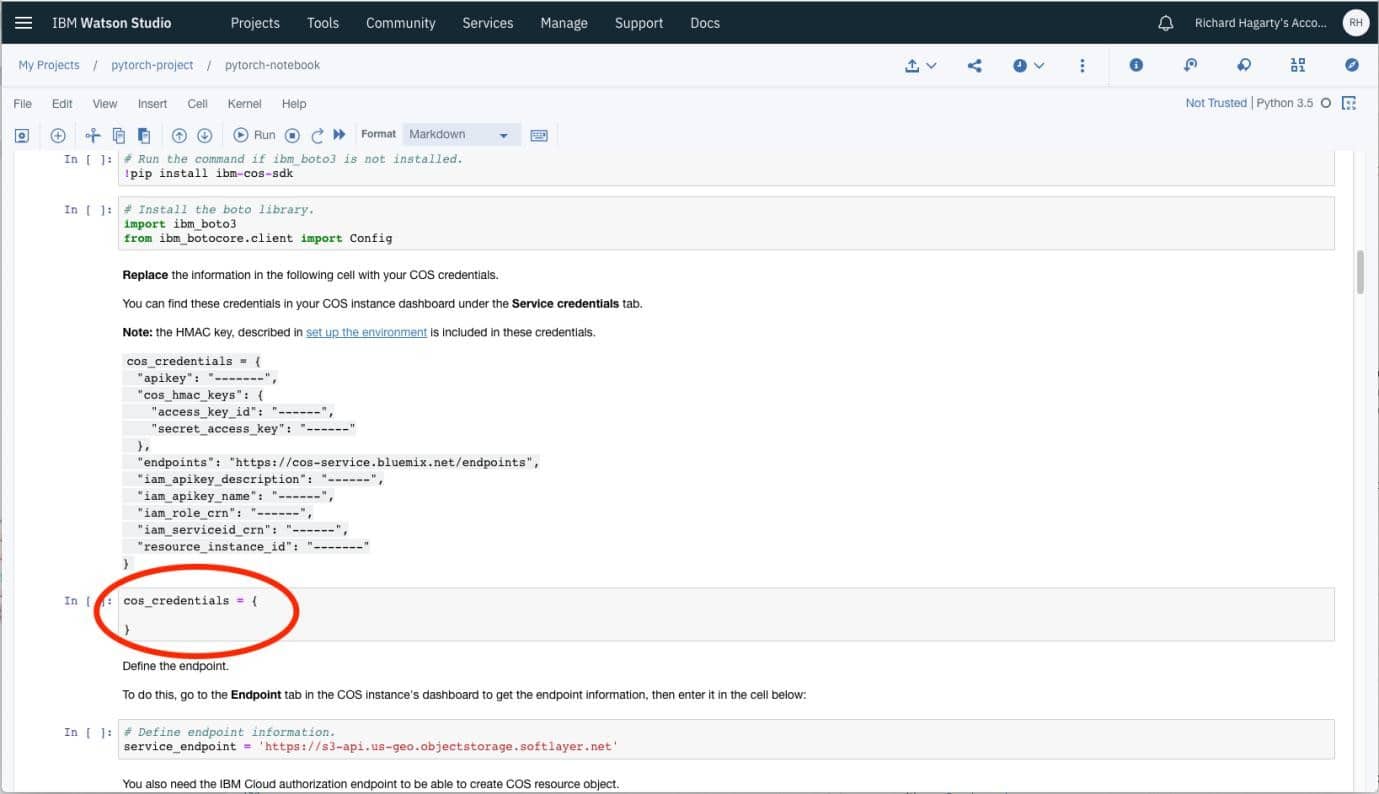
In the notebook available with this pattern, there is a cell which requires you to enter your Cloud Object Storage credentials. Copy and paste these credentials into that notebook cell.
- Run the notebook
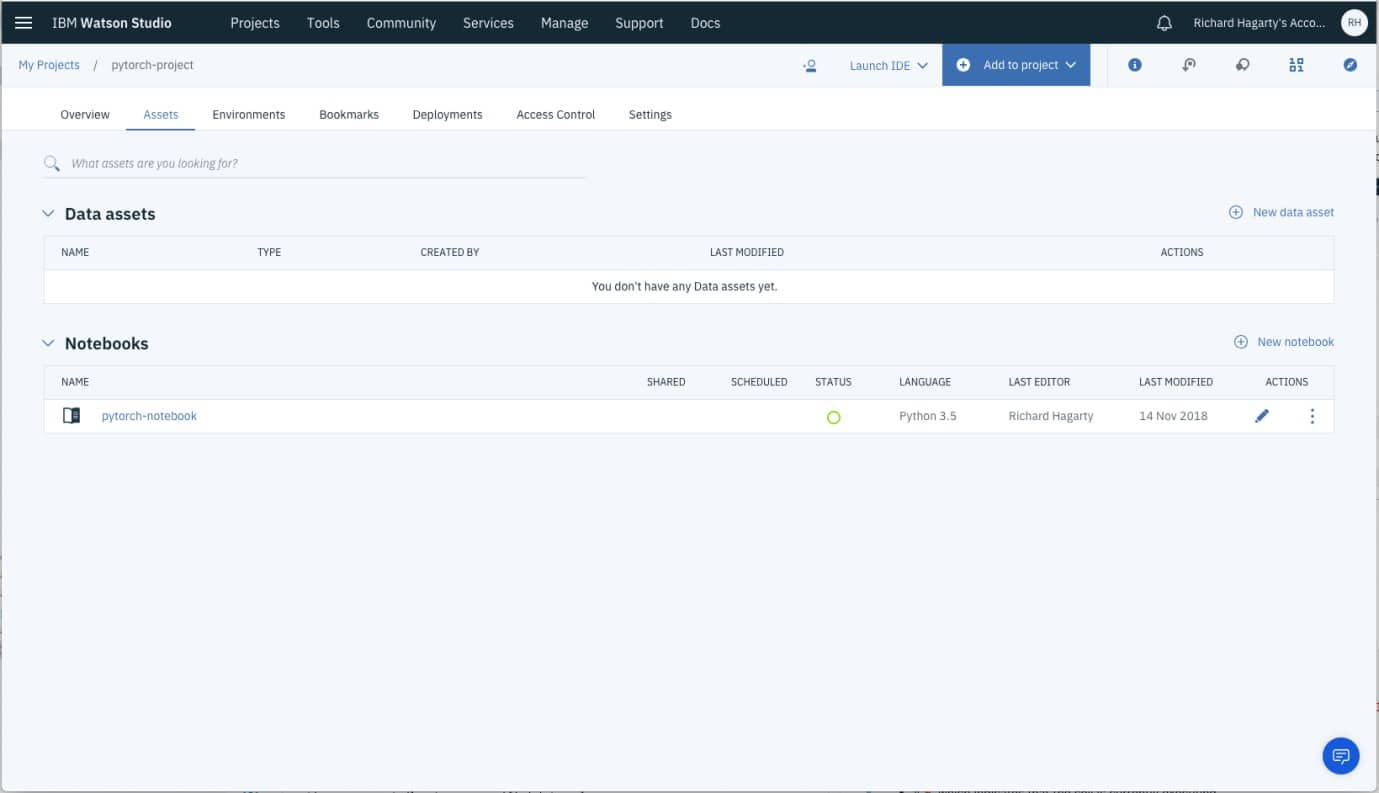
To view your notebooks, select Notebooks in the project Assets list. To run a notebook, simply click on the edit icon listed in the row associated with the notebook in the Notebooks list.
Some background on executing notebooks:
When a notebook is executed, what is actually happening is that each code cell in the notebook is executed, in order, from top to bottom.
Each code cell is selectable and is preceded by a tag in the left margin. The tag format is In [x]:. Depending on the state of the notebook, the x can be:
- A blank, this indicates that the cell has never been executed.
- A number, this number represents the relative order this code step was executed.
- A *, which indicates that the cell is currently executing. There are several ways to execute the code cells in your notebook:
One cell at a time.
- Select the cell, and then press the Play button in the toolbar.
Batch mode, in sequential order.
- From the Cell menu bar, there are several options available. For example, you can RunAllcells in your notebook, or you can RunAllBelow, that will start executing from the first cell under the currently selected cell, and then continue executing all cells that follow.
At a scheduled time.
- Press the Schedule button located in the top right section of your notebook panel. Here you can schedule your notebook to be executed once at some future time, or repeatedly at your specified interval.
- See the results
Once the model is trained we can use it to recognize handwritten digits.
Note: With only 1 epoch, the results might be less than perfect.
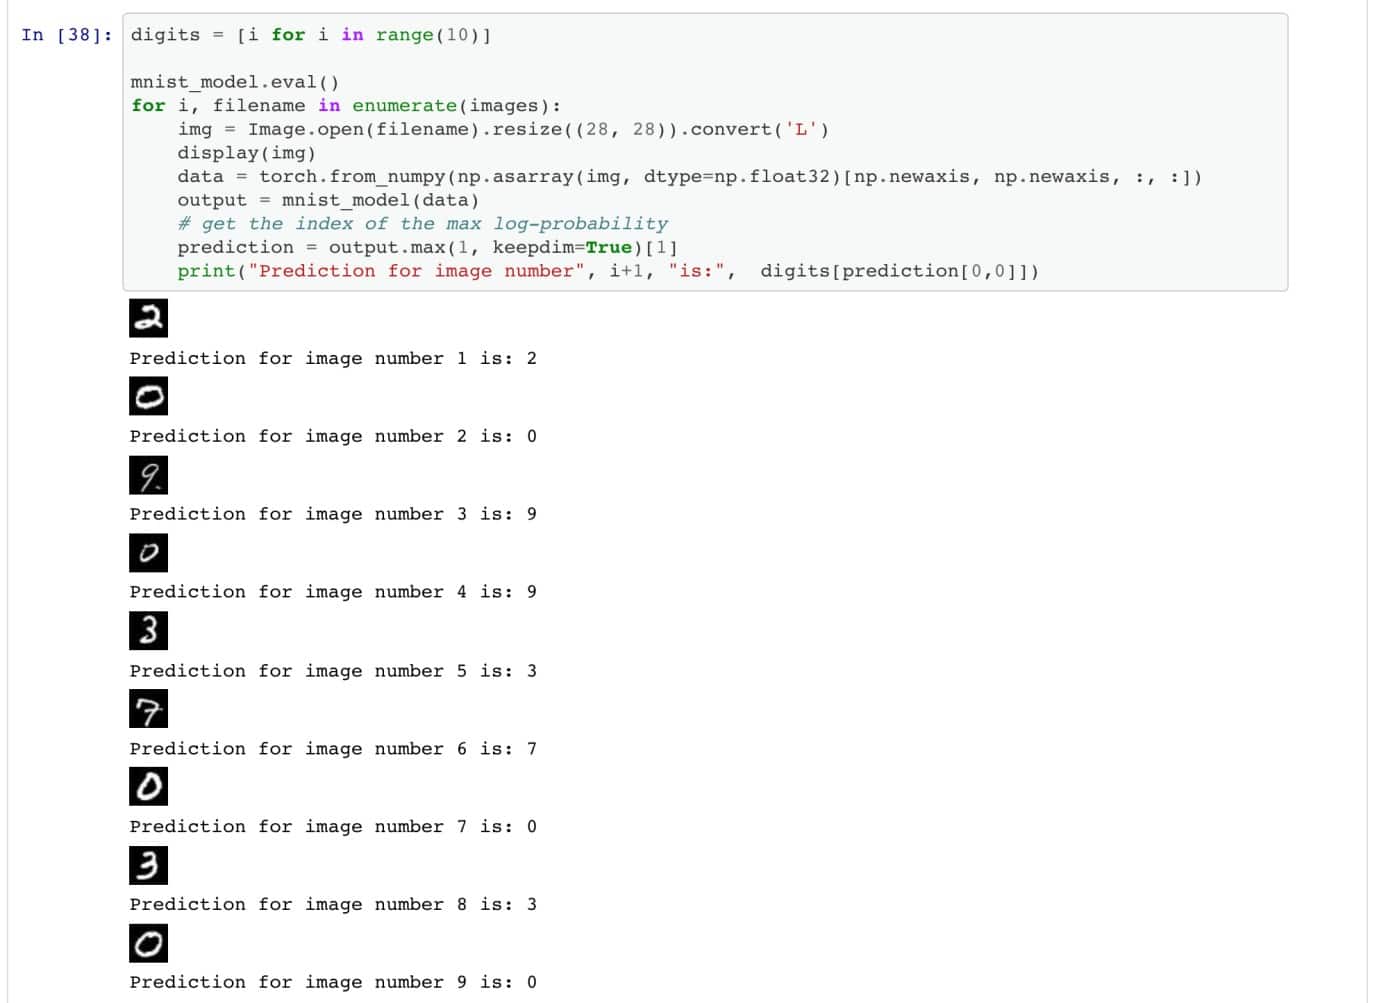
Sample output
View a copy of the notebook including output here.
To know more:- https://ibm.co/2ob1k5H
