In this article we will tell you how to put Android in disk drive mode. Here’s the complete discussion about it:
Another popular term for the Disk Drive Mode is the USB Mass Storage, UMS in short. You might have noticed that nowadays many Android devices like Jelly Bean powered phones are supporting only the Media Transfer Protocol. There are several advantages associated with this as you can access your mobile and computer simultaneously and it is safe to remove the device. However, you cannot expect the device to be mounted as USB Mass Storage as such.
Using Advance Power Menu for Mounting Android Devices as a Disk Drive
You ought to set up the Android device to the disk drive mode for using it on the Advance Power Menu, or APM as it is shortly known as. Follow the instructions for doing the process:
- Unlock the phone and use the right USB cable to connect the phone to the computer.
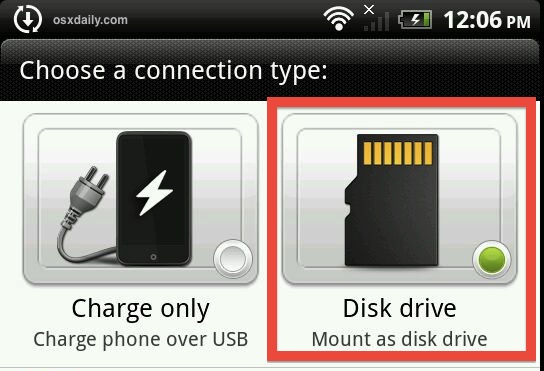
- A screen will appear on your android device’s display. Now, choose the “Disk Drive” option from the list of options.
- Now, tap either “Done” or “OK” button present on the phone.
- You can see a “Connect to PC” screen when the Android device is connected to APM. If this is not available in the device, then swipe down the “Window Shade” feature present on the top, and you can see the “Ongoing” Screen.
- Touch the status line of USB using the option “Ongoing Screen” which is displaying “Connect to PC” screen.
- From the options choose “Disk Drive”.
- Tap “Done” when finished.
Using Disk Drive Mode on Droid DNA
The same process will work for this too. Use the USB cable that accompanies the device and attach the device to the system by plugging this. Now, select the “Disk Drive” Mode after plugging in the device. When you are done, you can see that the device becomes more like a removable disk drive. Now, you can see that your media files can be dragged and dropped into your device now. When you have transferred the music you needed, unmount the device. Start playing the music through accessing and opening Music application. The device should be now recognizing the music.
Using Disk Drive Mode in New Galaxy S3
Method 1:
This process involves uninstalling the external hard drive and then connecting it again. If the USB that has been currently loaded has some issues, this is the apt method to choose.
- Click “Start”.
- In the Search Box type “Device Manager”.
- In the list of hardware, click “Disk Drives”.
- Now, uninstall the USB external hard drive, by right clicking it.
- Once the hard drive is uninstalled remove the USB cable.
- Now, reconnect the same after a couple of minutes and see that the disk driver gets loaded automatically.
- Go to Windows Explorer and check for the USB Drive here.
If you are connecting the external USB hard drive to a USB hub that has no power, the lack of power may hinder the operation of external drive. So, plug it straight into your computer.
Method 2
Proceed to method 2 if your issue is still not resolved. This process involves installing the latest Windows Updates and the USB external hard drive’s latest device drivers will be installed.
- Click “Start”.
- In the Search Box type “Windows Update”, you will find the same in the results pane, click it.
- Click the option “Check for Updates” and wait till the scan gets over.
- Click “Review optional updates”.
- Click “I Accept” after looking into a license agreement.
- Download and install updates by following the instructions.
- Reboot you computer for completing the installation process.
Imagesource
Reference:
