Here in this post we will tell you how to add search to context menu in Windows 8. Here’s the complete procedure explained:
Search is one of the most useful and a must have feature while you are working with Windows. Windows 8 is filled with a lot of innovative and amazing features but one of the downsides is that the start menu had been omitted. Since in the all new Microsoft Windows 8, there is no start menu, users sometimes get confused so as to how to reach to the search menu.
This option has been shifted in the Charms Bar or you may bring it up using the Windows Key + Q shortcut.
Wouldn’t it be really beneficial if you could bring it up right from the context menu? Well, this post will help you in doing the same in some really easy steps. Here we will be using the registry editor and after this procedure, you will be able to invoke the search option from anywhere easily.
Please make sure that you really intend to fiddle with your Windows default registry values before you get down with this procedure. Though there are not supposed to be any serious mishaps during this procedure but still have a thorough look at the registry restore techniques before you go with this procedure so that you may roll back the changes in case the procedure does not work or cause any glitches.
Add Search to Context Menu in Windows 8
- In order to open the Windows Registry Editor, either press the Windows Key + R keyboard shortcut or in the run dialog box type Regedt32.exe and hit enter.
- Now you need to navigate to the following section of the registry:
HKEY_CLASSES_ROOT\CABFolder\shell\find
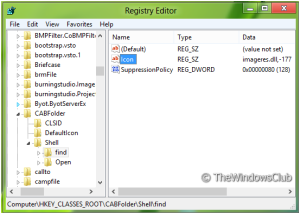
- In this section in the right side pane, create a new string with icon as its value name. Now set the value data to imageres.dll,-177. Also make sure that there is a 32 bit value of 80 provided to SuppressionPolicy.
- You are supposed to repeat this same step for the following locations in the registry also:
HKEY_CLASSES_ROOT\Directory\shell\find
HKEY_CLASSES_ROOT\Drive\shell\find
HKEY_CLASSES_ROOT\DesktopBackground\shell\Search
HKEY_CLASSES_ROOT\CLSID\{20D04FE0-3AEA-1069-A2D8-08002B30309D}\shell\Search
- Then you need to navigate to the following location:
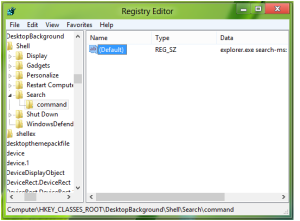
HKEY_CLASSES_ROOT\DesktopBackground\shell\Search\command
- Just in case, you are not able to find the registry entry named HKEY_CLASSES_ROOT\DesktopBackground\shell\Search\command, you also have the option to go to the entry named
HKEY_CLASSES_ROOT\DesktopBackground\shell\Search, and then create a new subkey that is named command.
In the right side pane, edit the default with value data to be explorer.exe search-ms:
- Repeat this same step for the following location as well:
HKEY_CLASSES_ROOT\CLSID\{20D04FE0-3AEA-1069-A2D8-08002B30309D}\shell\Search\command
- Now you are ready to invoke the search option form anywhere via the context menu directly.
A glimpse of the result of these changes that you have made in order to access the search option via the context menu is depicted in the image below.
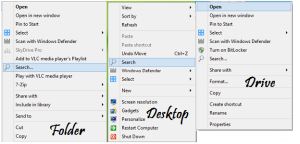
Hope that this helps you in easy access to the search options via the context menu directly. Now you can easily search your desired files or folders from anywhere just by right clicking and selecting the search option. Who needs a start menu now?
Note: In this entire procedure, you are trying to edit the default Windows registry values. Though the procedure has been tested to work properly and there should not be any risks. But still, in order to be on the safe side, do create a registry backup prior to going with this procedure and keep it safe with you. In case anything goes wrong, you will at least have the option to roll back and restore the registry to the default values so that there are no software glitches in your system due to this procedure.
